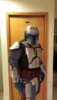
So I am new to the site here. but not completely new to prop building. I bought a full Jango setup from a member here. Some of it was not really what I was looking for (not as accurate as I was led to believe). So I set out this week to build a, from scratch, Holster set. Now there may very well be better ways to do this and I have never worked with leather before so bare with me and take this as a general guide, not a "how to" however I found this very easy to do and am positive that with about 60.00 give or take and a little time you can make your own as well.
So tools you will need
Leather punch $12.00 at fabric store
Leather Awl 16.00 at fabric store
some small nails
Hammer
A few razor blades
and a few optional tools as well depending on how you do it
Materials I used
6' strip of 1" leather $8.00
6' strip of 1/2" leather $5.00
a couple scraps of I believe 8# leather app $12.00
Leather dye $7.95
Wax Thread $2.35
6 Sam browne studs $2.39 (the metal studs that hold the belt adjustments)
A handful of chicago screws (1/4 I believe) $2.89
OK so I figured out which pieces of leather I was going to use for the tops and cut it into pieces that were a few inches larger on each side and on the bottom. I put them both in the sink full of warm water, and let them soak for about 30 minutes, give or take depending on how thick your leather is. You will want to use a less treated leather like a saddle leather. you will be able to tell by feeling it, how soft it has gotten.

While those were soaking I pulled out an old piece of wood that I could nail my leather down to. Now I used a couple resin Westars because they are full length. It would be a good idea to have a wood block to use as your template instead of the actual gun. But here is how I got around that. The idea is that if you pull the leather tight over the Pistol it may (in my theory) be too tight to remove from the holster easily. So what I did was wrap the pistol in bubble wrap, just a couple layers to bulk it out a little bit.

OKay with my board ready, my nails and hammers out and my pistols in hand we are ready to form.

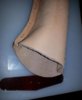
My pictures jump ahead a little as I am terrible as taking pictures during the work. But this gives you a great idea of how this goes. Lay your leather out over your gun making sure you have enough on all sides. At this point the leather is really easy to work with and very malleable.
Start with a nail in the very bottom and work your way around one side of the pistol back up towards the top. You want to pull it a little tight but not too tight and just playing with it will give you a good idea of where you need the nails.
As you get one side done, run something semi pointy but not sharp down the same side to create the line where your leather will bend I used the back of a spoon handle because it was close.

With the line made in the side of the leather and nails on one side as well it will give you a good idea on if you are pulling it too tight on the other side, because it will lift your line you made. So once again just play with it a bit and feel it out. Finish working your way up the other side with the nails and make your other line. Move around some nails or add some as needed. Once it is sitting how you want it, leave it be.
You will want to come by every now and then, and remake the mark down the side, you want to keep it nice and sharp. I just ran my spoon handle down the side of it every time I walked by for the first couple hours.
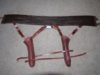
I gave mine about 20 hours to dry. then pull your nails and you can see that they hold their shape very well!


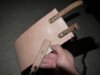
From here its all the easy stuff. Just trim down the sides a bit. I still left a little extra on mine, and then matched up the fronts with what I wanted to use for the backs. I used Some Contact cement to attach the front and backs together. Now in the screen used holsters they appear to have just 1 stitch on the top, on each side, and a couple at the very bottom. However I am ok with having stitching around mine and gaining the strength achieved by doing so. So I went ahead and used my leather awl to punch holes all the way around. and stitched them up with the wax thread.

From here just finish trimming down the sides to where you want them and using a dremel with a sand paper wheel will burn the edges and match up any imperfections, it looks great! However.........It will also make your house smell like burning flesh, I cant say how disgusting this really was haha.

And that is it for the holsters. I will stain these up later when I get done with the straps. More to come then.

So tools you will need
Leather punch $12.00 at fabric store
Leather Awl 16.00 at fabric store
some small nails
Hammer
A few razor blades
and a few optional tools as well depending on how you do it
Materials I used
6' strip of 1" leather $8.00
6' strip of 1/2" leather $5.00
a couple scraps of I believe 8# leather app $12.00
Leather dye $7.95
Wax Thread $2.35
6 Sam browne studs $2.39 (the metal studs that hold the belt adjustments)
A handful of chicago screws (1/4 I believe) $2.89
OK so I figured out which pieces of leather I was going to use for the tops and cut it into pieces that were a few inches larger on each side and on the bottom. I put them both in the sink full of warm water, and let them soak for about 30 minutes, give or take depending on how thick your leather is. You will want to use a less treated leather like a saddle leather. you will be able to tell by feeling it, how soft it has gotten.
While those were soaking I pulled out an old piece of wood that I could nail my leather down to. Now I used a couple resin Westars because they are full length. It would be a good idea to have a wood block to use as your template instead of the actual gun. But here is how I got around that. The idea is that if you pull the leather tight over the Pistol it may (in my theory) be too tight to remove from the holster easily. So what I did was wrap the pistol in bubble wrap, just a couple layers to bulk it out a little bit.
OKay with my board ready, my nails and hammers out and my pistols in hand we are ready to form.
My pictures jump ahead a little as I am terrible as taking pictures during the work. But this gives you a great idea of how this goes. Lay your leather out over your gun making sure you have enough on all sides. At this point the leather is really easy to work with and very malleable.
Start with a nail in the very bottom and work your way around one side of the pistol back up towards the top. You want to pull it a little tight but not too tight and just playing with it will give you a good idea of where you need the nails.
As you get one side done, run something semi pointy but not sharp down the same side to create the line where your leather will bend I used the back of a spoon handle because it was close.
With the line made in the side of the leather and nails on one side as well it will give you a good idea on if you are pulling it too tight on the other side, because it will lift your line you made. So once again just play with it a bit and feel it out. Finish working your way up the other side with the nails and make your other line. Move around some nails or add some as needed. Once it is sitting how you want it, leave it be.
You will want to come by every now and then, and remake the mark down the side, you want to keep it nice and sharp. I just ran my spoon handle down the side of it every time I walked by for the first couple hours.
I gave mine about 20 hours to dry. then pull your nails and you can see that they hold their shape very well!
From here its all the easy stuff. Just trim down the sides a bit. I still left a little extra on mine, and then matched up the fronts with what I wanted to use for the backs. I used Some Contact cement to attach the front and backs together. Now in the screen used holsters they appear to have just 1 stitch on the top, on each side, and a couple at the very bottom. However I am ok with having stitching around mine and gaining the strength achieved by doing so. So I went ahead and used my leather awl to punch holes all the way around. and stitched them up with the wax thread.
From here just finish trimming down the sides to where you want them and using a dremel with a sand paper wheel will burn the edges and match up any imperfections, it looks great! However.........It will also make your house smell like burning flesh, I cant say how disgusting this really was haha.
And that is it for the holsters. I will stain these up later when I get done with the straps. More to come then.
Last edited by a moderator:
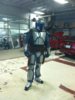
 Here are a few more pics in the off chance it does help anyone with their builds.