Steveboski's ROTJ build

Steveboski

Hunter
Hey everyone!

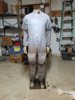
I've been following the threads on here since May, learning everything I can, picking up tips and tricks from some very talented people, and slowly putting my build together. I've decided to go ahead and start a thread with my progress to this point, and I'd love feedback and constructive criticism. Before I get any further, I'll lay out where I've picked up my kit.

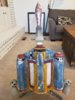
1. Armor, flight suit, vest, spats, gloves, pockets, belt: Bookmaker, painted by me
2. Gauntlets, helmet: TheZeroEffect, the helmet is an MS, the gauntlets are ruffkin, he painted both
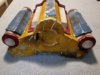
3. Jet Pack: DVH, painted by me
4. EE-3, 3d props NL, painted by me
4. Boots, belt: man of War
5. Braids: Woodman

Obviously there are more parts than this, and I'll reference the work as best I can as I move forward. My ultimate goal is 501st approval, but we have a local club, JediOKC, that I will be participating with for the most part.

Thanks for taking a look!
 
So here is an overall picture of where I am. I'll post individual entries with specific components and info about sourcing, threads referenced during the build, etc.

Does anyone else ever feel like you finally have all the stuff, you just need to actually finish the thing?
20181225_103738.jpg
 
I picked up the jetpack kit from DVH back in June. Lou was fantastic to work with, and the kit was great. I utilized TF's thread for my paint up, all humbrol paints.

Finished! Bobamaker jet pack ROTJ se paint up WIP

I'd never used an airbrush prior to this. Lots of learning on the go. I've still got to finish the rocket top and the thrusters. Then I need to do more weathering and seal the whole thing.
20181225_102321.jpg
 

Attachments

  • 20181225_102351.jpg
    20181225_102351.jpg
    3.4 MB · Views: 276
I purchased the armor from Boba Maker. Everything arrived in October and I elected to paint it with rattle cans as I was trying to get it done before it got too cold to paint. I found the thread below and it was very helpful.

SarlaccSlayer14's ROTJ Build

I've got the torso pieces mostly complete, I just need to put down the weathering and final details then dull coat. From what I've seen, the final step really tones down the green to the appropriate shade. Haven't started the knees at all, but will post more on those as I get to them.
20181225_102218.jpg
 
I purchased the EE-3 from 3d props NL, turnaround was about 9 weeks but well worth the wait. I opted for the kit rather than the troop ready as it seemed straight forward enough to paint. I'd rate the seller very high, while there were a few issues with my order, he maintained communication with me and resolved all issues right away. This kit is 3d printed and has an articulating trigger and real scope, so it just feels really cool.

I completed some minor assembly then put down several coats of primer. The print is very high quality, so between a little bit of sanding and thick primer, everything came out pretty smooth. Next I put down a coat of flat black. Since then I've been slowly adding the weathering with a tamiya weathering pack, silver/gun metal/rust. I've got a ways to go, but so far it looks okay I think.
20181225_102546.jpg
20181225_102537.jpg
 
It weighs 2-3 lbs tops. It's a little front heavy , but that may be common. Mine was a little wobbly in the break action, so I just glued it all together and it's very solid now.
 
Quick post about a sound option I've been working on.

I wanted an option to have Boba talk and after scouring the internet the only options I found were either not that great or too expensive. I decided to try to make a soundboard on my own instead. I picked up a soundboard from arduino, as well as an IR receiver and some other parts. I downloaded some audio files and loaded them up, put it all together in a project box and hooked up a speaker. I'll leave a pic here and a video of it in action over at the boba fett kit building group on Facebook
20181230_154220.jpg
. Please excuse the speaker, it's the only thing I've been able to find that is powered, has a headphone jack, and volume control...

Let me know what you guys think, if anyone's interested I'll post a parts list.
 

Attachments

  • 20181230_160916.jpg
    20181230_160916.jpg
    4.6 MB · Views: 311
Got a little work done this weekend, couple of quick posts to highlight.

First up, got the decals put on the jetpack. I took advantage of the sale that Fettology was having over the holidays and got the decals free with a fan system and ear trumpet (I'll post more on those later).

I'll weather the symbols when I finish out the jetpack once it gets a little warmer. Also, I picked up a metal stabilizer from MachineCraft.

20190113_155312.jpg
20190113_155312.jpg
 
Next up, finally got my harness from Big Dane assembled. I used my wife's sewing machine and sewed everything up. I found it very handy to leave some adjusting slack in the straps for fine tuning how the pack sits on your back.
20190113_155249.jpg
 
Quick post about a sound option I've been working on.

I wanted an option to have Boba talk and after scouring the internet the only options I found were either not that great or too expensive. I decided to try to make a soundboard on my own instead. I picked up a soundboard from arduino, as well as an IR receiver and some other parts. I downloaded some audio files and loaded them up, put it all together in a project box and hooked up a speaker. I'll leave a pic here and a video of it in action over at the boba fett kit building group on FacebookView attachment 170967 . Please excuse the speaker, it's the only thing I've been able to find that is powered, has a headphone jack, and volume control...

Let me know what you guys think, if anyone's interested I'll post a parts list.


love this!
 
Next up, finally got my harness from Big Dane assembled. I used my wife's sewing machine and sewed everything up. I found it very handy to leave some adjusting slack in the straps for fine tuning how the pack sits on your back. View attachment 171608
Great progress so far! I'm working on the harness right now and attaching the belts. The majority of the kit that I have is Bobamaker and the one thing I noticed on the one I'm working on and yours is that the ankle spats match the color of the flight suit and not the hip pouches. When I read the 501st CRL it says that the spats should match the hip pouches. Are you seeing something else by chance that shows the spats matching the flight suit?
 
Great progress so far! I'm working on the harness right now and attaching the belts. The majority of the kit that I have is Bobamaker and the one thing I noticed on the one I'm working on and yours is that the ankle spats match the color of the flight suit and not the hip pouches. When I read the 501st CRL it says that the spats should match the hip pouches. Are you seeing something else by chance that shows the spats matching the flight suit?

That's a great question. The updated crl over at the BHG does clearly state that the spats should match the left hip pouch in off white. The current standards are a little less specific I believe. To be honest, I'm a little confused on this as well, as I've seen quite a few kits with matching spats and those in off white. I'm basically trying to match the image below with my kit once it's all weathered, and to me the spats look gray and just clean compared to higher up on the flight suit.
Boba-Fett-Costume-Return-of-the-Jedi-Jabba-02.jpg

I do plan on doing a little weathering to the hip pouches, so I might try to get the colors a little closer then with the airbrush.

I would really appreciate anyone with greater knowledge on this subject to weigh in.
 
I’m not suggesting that I have “greater knowledge” on the subject, but based on the updated CRL, the right hip pouch is more tan, while the left is off white. The spats appear to match the left hip pouch color (off white), and are significantly cleaner. At least that’s how it looks to me!

As far as weathering - I made some black tea, and soaked my right pouch in it overnight and it seems to have done the trick!
 
Now that the weather has warmed back up, I've finally gotten back at the build. Since my last post I've weathered the flight suit, boots, and cape. I've also gotten a little more work done on the jet pack. I've done some painting to the rocket top and thrusters. Still a few pieces and parts to finish out there.
 

Attachments

  • 20190427_175941.jpg
    20190427_175941.jpg
    1.5 MB · Views: 266
  • 20190413_191921.jpg
    20190413_191921.jpg
    1.8 MB · Views: 274
This thread is more than 4 years old.

Your message may be considered spam for the following reasons:

  1. This thread hasn't been active in some time. A new post in this thread might not contribute constructively to this discussion after so long.
If you wish to reply despite these issues, check the box below before replying.
Be aware that malicious compliance may result in more severe penalties.
Back
Top