bobawife

New Hunter
I started working on building Boba Fett in April for my husband’s birthday in July and I haven't been as fast as I’d like but I’m finally making some progress. I have to accept that I’ll be gifting it incomplete and finishing it after with his knowledge but having him along for this adventure could very well become part of the excitement. I finished dyeing my flight suit and extra fabric to sew on the pockets, etc and wanted to explain my method and show photos and tips. Note: I did one for my brother as well so I was dying quite a bit of fabric and didn’t need to alter any measurements.

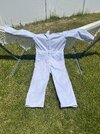
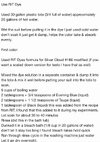
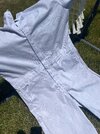
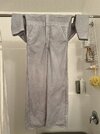
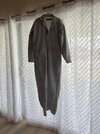
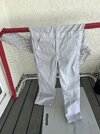
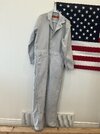
I used this recipe that I screenshotted off here, my apologies for not remembering the original poster. I changed my method slightly. I mixed and used these measurements, but make sure that when you’re mixing the colors and you think they’re blended, KEEP GOING. I thought I was thorough and still ended up with a few colored splotches on each flight suit from individual colors. I didn’t get the items wet beforehand. I used a section of PVC pipe as my stirrer since it was long. It also worked well to keep pushing down the bits of clothing that would float to the top of the dye mixture (watch out for that, it will make it uneven) and used it to lift out the items to check the coloring as it processed. Instead of air drying overnight, I tumbled dry air only (no heat) most of the way for the first round of dyes since I started it in the day and couldn’t do any dyeing the next day. I will say after the first round of dye my suits looked way too purple and even a little pink but it completely resolved with the second round so don’t be too afraid if you see that happening. I did the first bleach bath but after the second round of dye I liked my coloring so I opted to skip the second bleach bath. I did air dry the second round. These are photos of the same suit at the same time in different lighting. I want to show how drastic the color difference is in different lighting! It can be so confusing trying to find the right color when every photo and movie scene looks so different but rest assured, this is why!! I used Red Kap flight suits off of Amazon (the Kohls ones are awful for sizing reasons, don’t try them like I did.) The extra fabric I’m using for pockets is a pair of Red Kap pants, the sleeves I’m attempting to add from a cheap scrub top on Amazon but the fabric is a bit too different and dyed slightly more pink and purple even after much longer in the bleach bath so we’ll see how that goes. I’m not sure I recommend doing that. Now if anyone has any tips on sewing on the pockets and other flight suit add ons, let me know! That and finishing off my capes are the next steps
 

Attachments

  • C559D42B-482B-4146-8174-1A1888306294.jpeg
    C559D42B-482B-4146-8174-1A1888306294.jpeg
    3.6 MB · Views: 138
  • F70801CB-D5CF-4503-B0EB-0F8176D474F3.jpeg
    F70801CB-D5CF-4503-B0EB-0F8176D474F3.jpeg
    1.5 MB · Views: 147
  • C18214BC-6B0E-47F4-BEC8-C648E9A8C3C5.jpeg
    C18214BC-6B0E-47F4-BEC8-C648E9A8C3C5.jpeg
    1,008.2 KB · Views: 131
  • 208142B3-1BC1-4546-84F2-3C8DAC298F7D.jpeg
    208142B3-1BC1-4546-84F2-3C8DAC298F7D.jpeg
    3.1 MB · Views: 136
  • AC221704-C69C-4C56-92CE-8F4E7E9EDDDB.jpeg
    AC221704-C69C-4C56-92CE-8F4E7E9EDDDB.jpeg
    1.7 MB · Views: 131
  • 7EB14164-BEB6-48D7-BC97-36B37446B073.jpeg
    7EB14164-BEB6-48D7-BC97-36B37446B073.jpeg
    1.9 MB · Views: 126
  • 6357B866-A2E8-44CA-81B7-E20D65AD02C4.jpeg
    6357B866-A2E8-44CA-81B7-E20D65AD02C4.jpeg
    2.3 MB · Views: 127
  • 258F4791-9ABB-4ADA-9A04-3C7EE20E68E4.jpeg
    258F4791-9ABB-4ADA-9A04-3C7EE20E68E4.jpeg
    1.4 MB · Views: 137
I tried doing ToolGuy301's (I think he was the one that posted that original recipe) on a bed sheet for practice and it came out with a pink hue instead of a blue hue. I'm not sure what I am doing wrong but I suspect its probably something to do with the bleach. Don't know if anyone else has had this issue but its the reason I switched to using the smaller swaths without the bleach in btwn as the previous attempt had come out the same. I saw how much success you had and tried it again. I am just using typical concentrated walmart bleach. Are there differences in bleaches? Any advice would be welcomed!
 
How long did you dip it in the bleach solution for?
I think I did a little over 20 minutes but I’m wishing I did 30. I’m actually going to try to make the grey a shade darker now that I’ve sat with it. I’m feeling it’s a little too light
 
I tried doing ToolGuy301's (I think he was the one that posted that original recipe) on a bed sheet for practice and it came out with a pink hue instead of a blue hue. I'm not sure what I am doing wrong but I suspect its probably something to do with the bleach. Don't know if anyone else has had this issue but its the reason I switched to using the smaller swaths without the bleach in btwn as the previous attempt had come out the same. I saw how much success you had and tried it again. I am just using typical concentrated walmart bleach. Are there differences in bleaches? Any advice would be welcomed!
I just used a typical Walmart bleach too, I’m not too sure on that part actually. Mine came out pink/purple after the first dye and bleach, but after the second dye it didn’t so I skipped the second round of bleach. I thought I loved the outcome but the more I stare at it the more I want it a little darker. My only thought is maybe try skipping that second bleach bath? It could be worth a shot! Unfortunately that recipe seems to not have been perfected but formulation can be so hard with different fabric makeups and any other variables that could change from person to person
 
I think I did a little over 20 minutes but I’m wishing I did 30. I’m actually going to try to make the grey a shade darker now that I’ve sat with it. I’m feeling it’s a little too light
That’s incorrect! I read that as dye, not bleach. That would be way too long. I think between 2-5 minutes max, not long. It takes hold so quick
 
I did a lot of small quantity testing with little swaths of fabric using scaled down quantities of dyes, bleach and water (1 gallon). I found that the bleach seemed to react stronger to the black dye than any of the others, so I reduced it significantly. I did some research and learned that bleach reacts with pigments and fabrics vs just lightening them, it changes their chemical composition, so it changes greys and blacks, and even blues to pinkish colors. Actually, it changes just about everything to a pinkish color and its really, really strong so even like 1 once in 20 gallons of water will significantly react to both the dye and the fabric (it weakens the bonds in the fabric, but I don't think the low concentration will make a huge difference, but it definitely reacts to the dye). As such, I was being extremely conservative and dipping it in the bleach mix for like 5-10 seconds max. I tried desperately to copy the color scheme you did cuz I thought it was too cool how you got it to have different hues in different lights (the blue may have been a bit too baby blue but could knock that down with some griming in the weathering process). In the end, I reduced the amount of black, increased the beige, and kept to about 5 seconds of bleaching in both rounds. After the first round, it came out fairly bluish gray but I thought the 2nd round would make the gray more grayish and it did, but it might be too dark and not had enough blue remaining--the pearl gray sort of overwhelmed it. I included a picture--let me know what you think. I guess RIT makes a color remover so worse case I can always try and get is back to a washed out gray. I also washed it in Tide to make sure the colors were locked in. Thinking about hanging it outside in the 100+ degree heat to get it to fade a bit...

I haven't started weathering yet since this was stressful enough. For practice, I bought used hospital pants from Savers and dyed them the EXACT same way, and they came out looking more like the ESB version than the ROTJ version jumpsuit! Crazy. Only difference is that the jumpsuit I stitched together (I made everything myself, even my own scratch-built gloves and shoes) is 100% cotton twill and the hospital uniform is 55% cotton, 45% polyester. (If I made another one, I'd go with the cotton/poly blend!). My vest is 100% nylon with cotton batting. Not sure how well it will stain, but if I do, it will just be light gray. Might just airbrush that guy with acrylics like a lot of people recommend...
jumpsuit 1.jpg
 
For what it's worth guys, I don't even mess around with bleach in the dying process. It will usually end up changing the color in a way you don't want as you have already noticed. I also believe not all bleaches are created equal, especially now that most household bleach is non-chlorine.
 
I did a lot of small quantity testing with little swaths of fabric using scaled down quantities of dyes, bleach and water (1 gallon). I found that the bleach seemed to react stronger to the black dye than any of the others, so I reduced it significantly. I did some research and learned that bleach reacts with pigments and fabrics vs just lightening them, it changes their chemical composition, so it changes greys and blacks, and even blues to pinkish colors. Actually, it changes just about everything to a pinkish color and its really, really strong so even like 1 once in 20 gallons of water will significantly react to both the dye and the fabric (it weakens the bonds in the fabric, but I don't think the low concentration will make a huge difference, but it definitely reacts to the dye). As such, I was being extremely conservative and dipping it in the bleach mix for like 5-10 seconds max. I tried desperately to copy the color scheme you did cuz I thought it was too cool how you got it to have different hues in different lights (the blue may have been a bit too baby blue but could knock that down with some griming in the weathering process). In the end, I reduced the amount of black, increased the beige, and kept to about 5 seconds of bleaching in both rounds. After the first round, it came out fairly bluish gray but I thought the 2nd round would make the gray more grayish and it did, but it might be too dark and not had enough blue remaining--the pearl gray sort of overwhelmed it. I included a picture--let me know what you think. I guess RIT makes a color remover so worse case I can always try and get is back to a washed out gray. I also washed it in Tide to make sure the colors were locked in. Thinking about hanging it outside in the 100+ degree heat to get it to fade a bit...

I haven't started weathering yet since this was stressful enough. For practice, I bought used hospital pants from Savers and dyed them the EXACT same way, and they came out looking more like the ESB version than the ROTJ version jumpsuit! Crazy. Only difference is that the jumpsuit I stitched together (I made everything myself, even my own scratch-built gloves and shoes) is 100% cotton twill and the hospital uniform is 55% cotton, 45% polyester. (If I made another one, I'd go with the cotton/poly blend!). My vest is 100% nylon with cotton batting. Not sure how well it will stain, but if I do, it will just be light gray. Might just airbrush that guy with acrylics like a lot of people recommend...View attachment 237674
Wow I somehow missed this, those discoveries are crazy! I knew the bleach could weaken the fabric but the part about it turning everything to pink is new to me and it’s the strangest thing that it happens. I’m loving your flight suit color, it looks great! I might have to copy your methods to make mine slightly darker like yours. It looks like your colors took hold very evenly too, it looks perfect. I haven’t had to use it yet, but I’ve kept the RIT dye remover on hand at all times in case I needed to remove anything. Super impressed with you hand making the gloves and shoes, I haven’t found a pair of shoes I looks enough to buy yet and the gloves are so expensive for what they are so I’ll be looking into doing that as well.
 
I haven't made any tutorials or anything cuz I'm worried I won't get any responses, and I work all day. Maybe soon, or if someone asks...

Anyway, I used my airbrush to color the sleeves and knees and whatnot (backside) with acrylic paints from Walmart (mainly burnt umber, beige, black, grey, and black (use black sparingly)). If you don’t have an airbrush, get one! (Can't stress that enough) Or, maybe use spray bottles. I ended up airbrushing my bag (USAF lingo) 2 times because the first time I accidentally washed a good deal of the darker colors out when I put it through the washer with a tiny bit of liquid detergent and air dry. Probably for the best since I over did it. I washed it to lock in the color and low and behold, the detergent did its job (next time I will get the cheap stuff instead of the normal stuff from Dollar Tree, but in smaller quantities), It looked like the following pics. I am going to go over them with a bit more 'black grime' on the pockets when I have it all done.
Suit 3.jpeg
Suit 2.jpeg

Pouches 1.jpeg
Suit Arm.jpeg
Suit Pocket.jpeg
Suit Leg.jpeg
Suit 3.jpegSuit 2.jpegPouches 1.jpegSuit Arm.jpegSuit Pocket.jpegSuit Leg.jpeg
 
Last edited:
I haven't made any tutorials or anything cuz I'm worried I won't get any responses, and I work all day. Maybe soon, or if someone asks...

Anyway, I used my airbrush to color the sleeves and knees and whatnot (backside) with acrylic paints from Walmart (mainly burnt umber, beige, black, grey, and black (use black sparingly)). If you don’t have an airbrush, get one! (Can't stress that enough) Or, maybe use spray bottles. I ended up airbrushing my bag (USAF lingo) 2 times because the first time I accidentally washed a good deal of the darker colors out when I put it through the washer with a tiny bit of liquid detergent and air dry. Probably for the best since I over did it. I washed it to lock in the color and low and behold, the detergent did its job (next time I will get the cheap stuff instead of the normal stuff from Dollar Tree, but in smaller quantities), It looked like the following pics. I am going to go over them with a bit more 'black grime' on the pockets when I have it all done.
View attachment 237974View attachment 237975
View attachment 237976View attachment 237977View attachment 237978View attachment 237979View attachment 237974View attachment 237975View attachment 237976View attachment 237977View attachment 237978View attachment 237979
 
Wow, nice weathering! You should definitely upload some tutorials on YouTube. That’s my go-to and unfortunately they’re a little light in the boba fett building category. Not many tutorials at all, I think I’ve already watched them all. Would be great to see you put some up there!
 
I agree. There are a couple good tutorials on here but they are hard to find. I think most folks prefer to buy the costume items so there isn't a great deal of DIY stuff (again, there probably are but I can't find them). Of the maybe 100+ parts in this costume (ROTJ Hero) that I have been working on for the last 2+ years, I have bought two (rangefinder light and chest armor display), 3-D printed about 5 (most of which I remolded to polyurethane because they take to sanding better than PLA), and EVERYTHING ELSE I built from scratch and totally loved doing it. I've made plaster castings of my feet to make the shoes, sewed multiple gloves, cast numerous helmets, gauntlets, and jetpacks out of fiberglass before throwing them all away and using PVC sewer pipe and for sale signs. To me, building it was more fun than anything else (except seeing the full-size action figure in my craft room). (I'm not planning on posting any pics of the full Fett until I finish everything, and I am almost done!)

However, glad to share any wisdom on how I did it. Are there any specific items you'd like to see how to make?
 
This thread is more than 8 months old.

Your message may be considered spam for the following reasons:

  1. This thread hasn't been active in some time. A new post in this thread might not contribute constructively to this discussion after so long.
If you wish to reply despite these issues, check the box below before replying.
Be aware that malicious compliance may result in more severe penalties.
Back
Top