I started off 3D printing the helmet from Nikko Industries. As I have now studied more pics of this character I realized this helmet has some shortcomings and the one from DO3D is way more accurate. Too late now but if she is going to wear this again I can always make the upgrade.
I didn't take pics of the printing and finishing process but this is the way I go about it now and it works well for me and is pretty quick.
1) I glue the pieces together with CA glue, building up the seams and sanding flush after. Any bondo work needed is done at this point.
2) I sand down the whole helmet with 80 and 120, using 80 only where I need to get more aggressive to remove most of the print lines.
3) I coat the whole helmet with a THIN layer of epoxy and let cure overnight
4) I sand down again with 120, then 180 and finally 220. Any fine print lines should be filled at this point but if some are still present then I use the red glazing putty to fill these and sand again.
5) I spray with two coats of filler primer and sand between coats with 220. I don't go to heavy with the filler primer as I have found that if you try to fill print lines this way, the primer will cure over a couple of months and print lines come back on your finished prop. The last grit for sanding will depend on the final finish of the helmet. Since this has a flat finish 220 is fine. If I were doing a polished helmet then I would step up to 600.
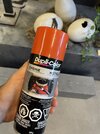
I used an orange engine enamel for the paint. The airbrushing was a thinned out brown/ black acrylic mixture. I misted with a slight sandy color and sealed with a matte finish. The dings were applied with a silver paint pen.
I missed a couple of print lines but I can easily go back in and fix these later. They really are not noticeable in person but look really bad in the above pic.