Superjedi's FPH-ESB for Grifter

superjedi

Sr Hunter
Hi all!
It's been a few months, but I'm at it again. :) I just received a helmet kit from Grifter and this one will be done in ESB.
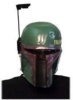
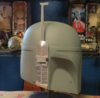
This will be an interesting paint up, because the helmet is one of FP's original FPH buckets--number 12 of 12 to be precise.
I haven't worked on one of these since around 2008 or so. My own personal ESB helmet is an FPH, so it'll be nice to
revisit the kit.

This project is also a personal milestone. This will be my 20th ESB helmet! I've loved the ESB paint scheme for ages, and
it's hard to believe I've done so many of them, LOL. I think I've probably done at least 10 other helmets besides ESBs,
including the Pre-pro versions and a custom job based on one of Joe Johnston's concept sketches. Sheesh. . . maybe it's
time to retire. ;)

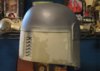
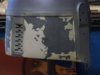
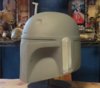
Anyway, on to the kit! The FPH is very nicely cast in fiberglass. It's thin and strong, and is a typical representation of FP's
casting expertise. This one also comes fully loaded with a beautiful set of metal ears. I love metal ears on an ESB bucket!

IMG_4067_zps5t7ciei3.jpg


IMG_4068_zpsj1ojxm5v.jpg


I'll do some finishing work on the ears to smooth out the machining marks. But it's nothing that's too involved.

IMG_4069_zpsdjtq1v1r.jpg


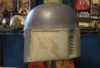
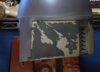
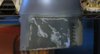
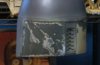
Grifter rounded out the package with a multi-piece RF topper, a resin MQ-1 insert, and a visor (not pictured).

IMG_4070_zpsaunchbwr.jpg


I'll begin working on the helmet this weekend by trimming out the visor area and the keyslots. I've gotten spoiled with the more recent
helmets having the MQ-1 molded in. :lol: But some work with the ol' Dremel and some jewelers files will take care of them.
Much more to come. . . .
 

Attachments

  • IMG_4067_zps5t7ciei3.jpg
    IMG_4067_zps5t7ciei3.jpg
    139.5 KB · Views: 230
  • IMG_4068_zpsj1ojxm5v.jpg
    IMG_4068_zpsj1ojxm5v.jpg
    100.5 KB · Views: 229
  • IMG_4069_zpsdjtq1v1r.jpg
    IMG_4069_zpsdjtq1v1r.jpg
    112.1 KB · Views: 231
  • IMG_4070_zpsaunchbwr.jpg
    IMG_4070_zpsaunchbwr.jpg
    75.5 KB · Views: 230
20 helmets wow! I will be watching this one, can you list the colors and brand you use as you go along please, it's nice to see peoples interpretations on what they use :thumbsup:
 
No photos for today, but I've done all the cutting and filing and sanding and drilling and detonating to cut out the visor area
and the keyslots. I washed the helmet thoroughly with some grease-removing dish soap to get rid of all the sanding dust
and I should be able to lay down a coat of primer tomorrow. The helmet arrived with a couple of small scratches on the
dome and right cheek, and I need a fresh layer of primer to see if they'll need any attention before I begin the color coats.

PICS OR IT DIDN'T HAPPEN! lol jk dood <3
 
Hi collector,
I'm not sure I understand your question. This is not an FPH2. It's an original FPH from back around 2007 or so.
The FPH2 is a different helmet entirely.
 
Whew. . . been busy the past few days, but I'm managing to sneak in some Fett time.
After priming the helmet I discovered an area that needed some additional attention. I applied some Bondo and resanded and reprimed.
Once everything was dry, I began the rear panels by airbrushing Polly Scale Concrete. That dried overnight and I started making some new
templates. I have sets of templates for the GMH and the FPH2, but since the FPH is slightly larger than either of those, the templates didn't
fit properly. I began the damage process by stenciling the rear panels and applying some masking fluid. Here's how it looked.

IMG_4071_zpstqkt6q7c.jpg


IMG_4072_zpsd9mvgkzx.jpg


As of about an hour ago, the dark green was airbrushed on. Once it dries I'll remove the masking fluid and start some detailing. :thumbsup:
 

Attachments

  • IMG_4072_zpsd9mvgkzx.jpg
    IMG_4072_zpsd9mvgkzx.jpg
    114.1 KB · Views: 232
  • IMG_4071_zpstqkt6q7c.jpg
    IMG_4071_zpstqkt6q7c.jpg
    106.6 KB · Views: 209
Unmasked the rear panels after airbrushing the dark green and did some additional tweaking of the damage shapes using a fine brush.
I always do this on my helmets. The masking fluid gets me pretty close to where I want to be, but I go back using reference pics and
fine tune some areas where the mask didn't quite flow into the smaller shapes.

IMG_4074_zpsyxby4awu.jpg


I also did some "mechanical" weathering. I added some fades using fine wire wool and some physical scratches using a sharp metal tool.
If you are able to get your hands on some old dental tools (clean of course), they're great for scribing and scratching.

IMG_4076_zpsavbpoppc.jpg


The rear panels have that nice faded, oxidized appearance, so I try to replicate that using multiple passes with the airbrush. I begin with
a light to medium overall coat, then go back and darken certain areas using my reference pics. I haven't done any of the fine scratches on
the right panel yet. Some of them overlap the gray the silver, which is what I'll be painting next.
 

Attachments

  • IMG_4074_zpsyxby4awu.jpg
    IMG_4074_zpsyxby4awu.jpg
    113.7 KB · Views: 228
  • IMG_4076_zpsavbpoppc.jpg
    IMG_4076_zpsavbpoppc.jpg
    102.8 KB · Views: 218
The left panel is finished. :thumbsup:

I completed the gray and silver detailing a little while ago and went back and added the final physical scratches.

IMG_4081_zps9rgqfsg1.jpg


All that remains is the pale contrasting gray on certain spots. I like to do that all at once at the end of the project since there's
some of it scattered all over different parts of the helmet. Here's another angle.

IMG_4078_zpskjypjsr0.jpg


The right panel is up next, but there will be a small delay as I'm going out of town for work for 4 days. But I'll be back at it soon!
 

Attachments

  • IMG_4078_zpskjypjsr0.jpg
    IMG_4078_zpskjypjsr0.jpg
    90.9 KB · Views: 200
  • IMG_4081_zps9rgqfsg1.jpg
    IMG_4081_zps9rgqfsg1.jpg
    104 KB · Views: 203
This thread is more than 8 years old.

Your message may be considered spam for the following reasons:

  1. This thread hasn't been active in some time. A new post in this thread might not contribute constructively to this discussion after so long.
If you wish to reply despite these issues, check the box below before replying.
Be aware that malicious compliance may result in more severe penalties.
Back
Top